Part 1: “First Steps”: Overview & Architecture
In this tutorial, I provide a broad overview on the Kafka technology for development and operations as well covering the following steps. In the first tutorial, you have:
- A basic understanding of the Kafka architecture
- A single node Kafka installation up and running
- Using the command line interface, you can start a producer and send information
- Using the command line interface, you can start a consumer and receive information
Please note that we do not discuss the scenarios when to use Kafka. Also, the tutorial is based on Windows 10. If you work with Linux, some of the commands in section 1 might differ.
1.1 Kafka Architecture
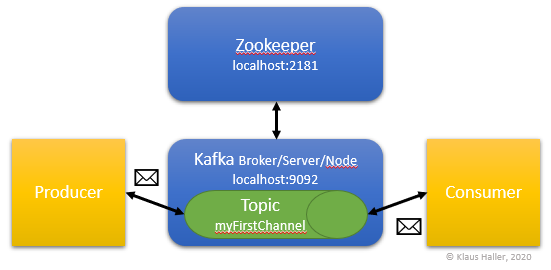
From the perspective of developers, Kafka is a pub/sub (publish and subscribe) solution enabling various applications to talk with each other. The senders (or “producers” in Kafka terminology) do not have to know who might be interested in the messages or events they share. They publish information related to certain topics. The receivers (or “consumers” in Kafka) also do not have to know who exactly creates events and message they are interested in. They just have to subscribe to a topic and get all the information.
From an administrator perspective, a Kafka installation consists of a Zookeeper application as a kind of orchestrator and one or more brokers that provide the actual functionality for producers and consumers.
This first tutorial focuses on a simple installation: one Zookeeper instance and one broker as illustrated in the figure below. Load balancing and fault-tolerance are discussed in Part 2 Kafka Fault Tolerance using Replica and Part 3 Kafka Throughput Optimization using Partitions and Consumer Groups of my tutorial. Security topics are discussed in Part 4: Kafka Security Basics.
1.2 Prerequisite Java Run Time Environment
Kafka requires a running Java runtime environment. You can type in “Java -version” in a command shell to verify this. As a result, you get the installed version number. This tutorial bases on java version “13.0.1” 2019-10-15. If the system returns the error message 'Java' is not recognized as an internal or external command, operable program or batch file. you have to install a Java Runtime Environment or finish the installation by configuring path variables.
1.3 Download and Install Kafka Files
You can download Kafka from this webpage: https://kafka.apache.org/downloads. This tutorial bases on version 2.4.0 and binary build 2.13 from December 16th, 2010 and the name of the downloaded file is kafka_2.13-2.4.0.tgz.
After the download is completed, unpack the file. You should now see a folder kafka_2.13-2.4.0.
1.4 Configure and Start Kafka
There are two configuration files, one for the Zookeeper instance and one for the/a Kafka server. The files are:
kafka_2.13-2.4.0\config\zookeeper.properties
and
kafka_2.13-2.4.0\config\server.properties
The only configuration you have to do is setting the path for all the log files in the server.properties file by defining the log.dirs property:
# A comma separated list of directories under which to store log files
log.dirs=C:\Users\yourusername\kafka_2.13-2.4.0\logs_server0
To get a better understanding of the Kafka installation, you might be interested in checking the parameters for the connection from the Kafka server to the Zookeeper. In the Zookeeper’s property file, there is a parameter that defines on which port the Zookeeper is listening for Kafka servers:
# the port at which the clients will connect
clientPort=2181
The Kafka properties file defines where to connect to a Zookeper instance:
zookeeper.connect=localhost:2181Thus, in case of this simple installation, the Kafka server will look for a Zookeeper on the local machine.
1.5 Start the Kafka Installation
We are now ready to get our Kafka system up and running. This requires that we first start the Zookeeper. This can be done as follows for a Windows system:
- Open a new command shell
- Change to the Kafka bin directory for Windows
cd kafka_2.13-2.4.0\bin\windows - Start the Zookeeper
zookeeper-server-start.bat ..\..\config\zookeeper.properties
Note: If you work with Linux, you use the .sh scripts in the \bin folder instead.
It takes some seconds until Zookeeper is up and running. You should see the following text on the shell as Zookeeper output:
INFO Using checkIntervalMs=60000 maxPerMinute=10000 (org.apache.zookeeper.server.ContainerManager)
INFO Creating new log file: log.9a (org.apache.zookeeper.server.persistence.FileTxnLog)
Note. The last line might only show up the first time you start Zookeeper.
With Zookeeper up and running, we can start now the Kafka server:
- Open a new (!) command shell
- Change to the Kafka bin directory for Windows
cd kafka_2.13-2.4.0\bin\windows - Start the Kafka broker
kafka-server-start.bat ..\..\config\server.properties
Now we just have to be sure that the server actually started. We should see the following last line in the command shell:
INFO [GroupMetadataManager brokerId=0] Removed 0 expired offsets in 0 milliseconds. (kafka.coordinator.group.GroupMetadataManager)
1.6 Sending a Hello Kafka World Message
In order to be able to send our first message or event using Kafka, we need a topic to which consumers can subscribe to and receive messages that producers send for this topic.
We open a new command shell in windows and run the following commands:
cd kafka_2.13-2.4.0\bin\windows
kafka-topics.bat --create --zookeeper localhost:2181 --replication-factor 1 --partitions 1 --topic myFirstChannel
In the same command shell, we start now a consumer service:
kafka-console-consumer.bat --bootstrap-server localhost:9092 --topic myFirstChannel --from-beginning
The consumer is now ready and waits for a message or event. In order to send a message, we need a producer. Thus, we open another new command shell, the fourth one, and start a simple producer process:
cd kafka_2.13-2.4.0\bin\windows
kafka-console-producer.bat --broker-list localhost:9092 --topic myFirstChannel
We now type in “Hello Kafka World!”. Once we hit the return button, we can see the message as well in the consumer window. We have a simple, running Kafka installation and send and received a simple message. We are done with section 1 of the tutorial: First Steps.
It is time to clean up before we begin with part 2 of the tutorial:
- Keep the Zookeeper and Kafka server command shell windows and keep the processes running.
- Stop the consumer and the producer applications and close the command shells.
Click here to continue with the next part of the tutorial.