Serverless application logic, storage accounts, platform-as-a-service identity and access management, this small tutorial combines state-of-the-art Azure technologies in a four-step demo or tutorial. The result: a serverless Azure Function invoked via a web browser that returns a welcome text, which the Azure Function reads from an Azure Storage account using Azure Identity for authentication and authorization.
Prerequisites for performing this tutorial are:
- An Azure cloud account (we use only free services)
- A local Visual Studio installation (free version sufficient)
Setting up the Azure Storage Account backend
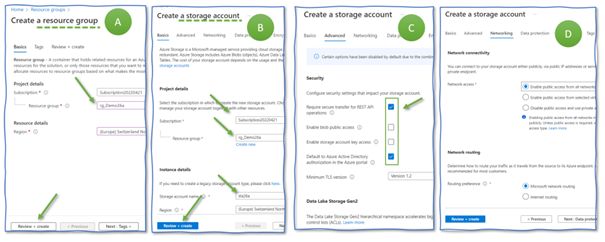
Create a resource group named “rg_Demo26a” (Figure 1, A). The resource group collects and stores all the resources we create in the following. Having all resources in a dedicated resource group eases cleaning them up after completing this demo.
Next, create an Azure Storage account “sta26a” (Figure 1, B) in the resource group “rg_Demo26a”. On the “advanced” tab, disable public access and storage account key access and enable default Azure Active Directory authorization (C). Then, advance to the “networking” tab. Here, make sure to have “enable public access” activated (D). This setting means that our storage is directly connected to the Internet and only protected by access management methods. It is a dangerous setting, though it saves us time in the demo. Never do this in any Azure subscription used for anything but for playing around.
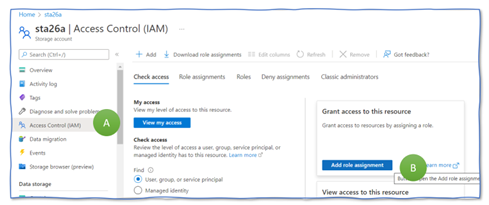
Creating a Storage account does not allow you to upload or read files. Thus, before actually uploading any file to the Storage Account, you need to grant yourself “Contributor” rights for the Storage Account. Therefore, go to your Storage Account “sta26a”, select “Access Control (IAM)” in the menu to the left (Figure 2, A), and push the “Add role assignment” button (B).
Then, search for roles containing “blob” (Figure 3, A), select the role “Storage Blob Data Contributor” (B), and click “next” (C) to proceed to the next submask. Here, choose “user, grout” for the “Assign access to“ setting (D) and click on “sel3ect members” (E). A new submask appears to the right. It presents the users of this Azure tenant. Select the user you are currently logged in (F) and have a coffee afterward. It takes a few minutes until the new rights are active. If you proceed too early, the next step fails.

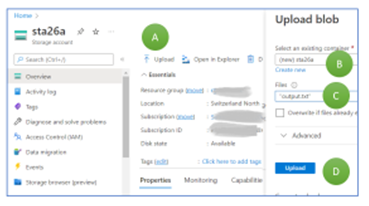
Now you are ready to upload a file. Create a text file “output.txt” on your laptop with the content “Hello world, hello Klaus!”. Upload this file into our Azure Storage Account.
Switch to the newly created Storage Account and select “upload” (Figure 4, A). Select “Create new” and type in “cont26a” as container name (B). Open the file explorer by clicking on the symbol to the right. Select the file we just created (C). Then, press “Upload” to load the file “output.txt” to the cloud (D). If the upload button is not blue, something went wrong in any of the previous steps.
As a last step in the Azure Portal, for now, open the Storage Account sta26 and select the storage browser (A). Click on the blob containers (B), then on “sta26a” (C). You see the list of files stored there. Click on the three points at the right of the row “output.txt” (D) and click “Copy URL” (E). Paste the URL in some document or file. You need the string in half an hour. Then, for the next step, switch to Visual Studio.

Creating an Azure Function
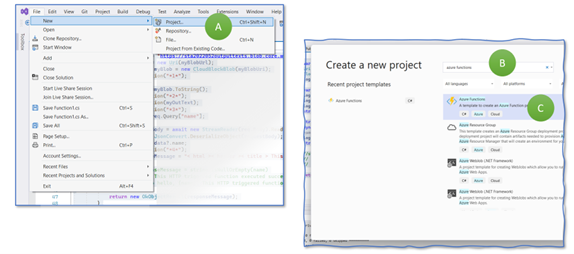
We create, first, a simple predefined Azure Function and deploy it to the cloud. It does not connect to our Storage Account. The step is more for verifying that the overall setup is correct. In VisualStudio, select “File > New > Project” (Figure 5, A). VisualStudio will propose various templates. Type in “Functions” into the search field (B), select “Azure Functions,” and continue (C). If you do not find this template, you can install missing ones after clicking on “Not finding what you are looking for? Install more tools and features” and search for “Azure development”.
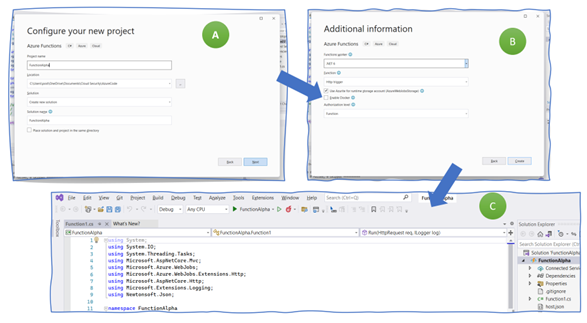
The next mask asks you for a function name (use “FunctionAlpha”) and a location where to save your files (Figure 6, A). Then comes the “additional information” tab. Select “.NET 6” and “http trigger” as the function you want to get created. Make sure that the other settings are as in figure (B): select “Use Azure,” deselect “Docker,” and use the function scope as authorization level. As a result, VisualStudio creates a simple function that returns some output when invoked.
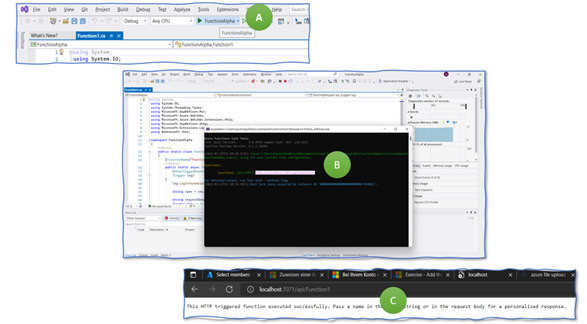
We execute the code now locally on your laptop. Run the function by clicking on “FunctionAlpha” next to a green triangular on the menu to the top (Figure 6, A). A new window opens up, in which the listener process runs. This process waits for incoming http requests. To send a request, copy the URL provided in the window (B) and paste it into a web browser window. You should get the output as shown in the figure (C).
We now know that the function works locally on the laptop. Next, we deploy this function to an Azure runtime environment so that the function runs – serverless – in the cloud.
Deploying and Invoking an Azure Function
Azure comes with a feature to structure your functions – you do not create an Azure Function directly in a resource group but collect them in one or more Azure Function Apps. Create one in the Azure portal (Figure 8, A). Use resource group “rg_26a” and type in “FunctionApp26a” as the name for the Function App. Select “Code” as the way of publishing, “.NET” as runtime stack, “6” as the version, and “Windows” as the operating system. On the next mask (B), choose to create a new storage account and type in “stafa26a” as its name. Select “review and create” and start the creation process.
Wait until you see that the resource has been created (C).

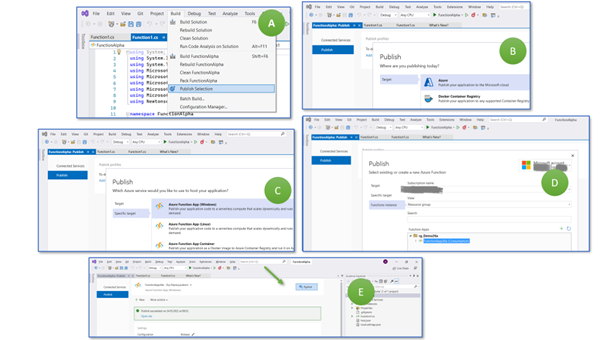
To deploy the function to the Azure cloud, select “Build > Publish Selection” (Figure 8, B), then “Azure” as target (B), and “Azure Function App (Windows)” (C). Finally, choose your subscription, then select the resource group “rg_Demo26a” and the recently created Azure Function App “FunctionApp26a” (D). Continue and wait for the (quick) configurations to take place.
You might think you are done. I thought precisely the same several times. However, you have to go back to “Build > Publish Selection” and click the publish button (E).
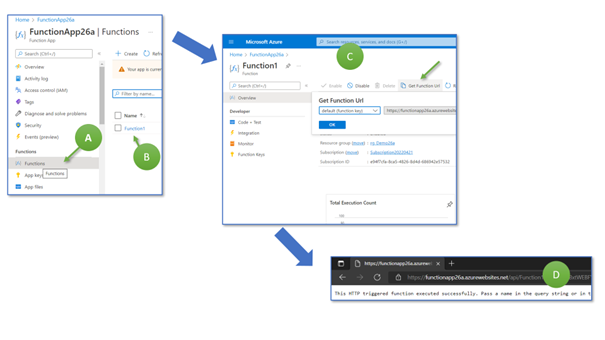
Now, switch back to the Azure Portal. In the Azure Function App screen, we choose “Functions” in the menu bar to the left (A). We now see our function with the name “Function 1” (B). Click on the name to open the details page, where you can retrieve the web function’s URL (C). Click on “Get Function URL,” copy the link, and paste it into a web browser (D).
Connecting the Worlds …
We have created a Storage Account with one text file that our function should display when invoked via an internet browser. Therefore, we modify the function and read the welcome text from the Storage Account.
Open Visual Studio again and replace the Azure Function code with the following (check and update the blob URL if necessary):
using system;
using system.Threading.Tasks;
using Microsoft.AspNetCore.Mvc;
using Microsoft.Azure.WebJobs;
using Microsoft.Azure.WebJobs.Extensions.Http;
using Microsoft.AspNetCore.Http;
using Microsoft.Extensions.Logging;
using Azure.Storage.Blobs;
using Azure.Storage.Blobs.Models;
using Azure.Identity;
namespace FunctionAlpha
{
public static class Function1
{
[FunctionName("Function1")]
public static async Task<IActionResult> Run(
[HttpTrigger(AuthorizationLevel.Function, "get", "post", Route = null)] HttpRequest req,
ILogger log)
{
log.LogInformation("C# HTTP trigger function processed a request.");
ManagedIdentityCredential myCredentials = new ManagedIdentityCredential();
log.LogInformation("**1**");
var myBlobUrl = "https://sta26a.blob.core.windows.net/sta26a/output.txt";
BlobClient bc = new BlobClient(new Uri(myBlobUrl), myCredentials);
log.LogInformation("**2**");
BlobDownloadResult downloadResult = await bc.DownloadContentAsync();
string downloadedData = downloadResult.Content.ToString();
log.LogInformation("**3**");
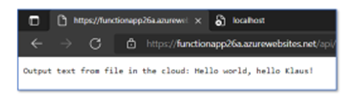
return new OkObjectResult("Output text from file in the cloud: "+ downloadedData);
}
}
}
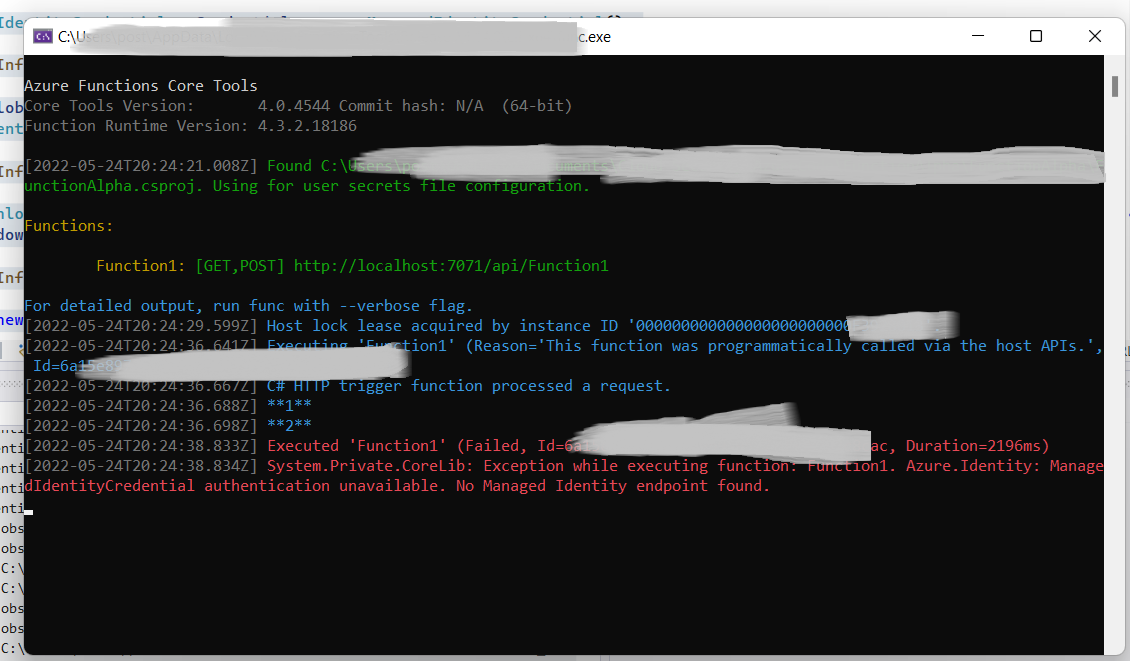
Save the file, run it locally, and invoke it as before in Figure 8. Now you should get an error message in the browser; the listener process should display an error message (see Figure 12).
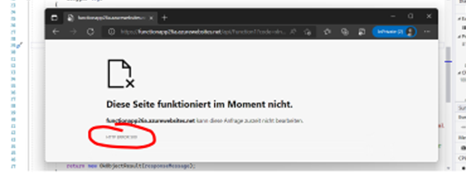
Next, deploy the updated Azure Function to the Azure Cloud, following the steps already shown in Figure 10. Then, run the function as illustrated in Figure 11. The result is another error message (HTTP Error 500), as Figure 13 illustrates. The exact text depends on your browser and the browser (language) settings.
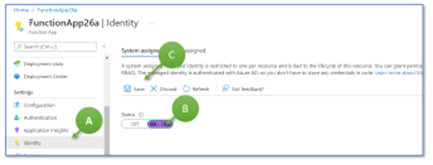
The reason is simple: the Azure Function still has no read access to the file in the Azure Storage Account. To reach this aim, we have to switch on the system-assigned managed identity for our Azure Function App “FunctionApp26a”. Go to this Function App and select “Identity” in the menu bar to the left (Figure 14, A), change the status to “on” (B), and save the change (C).
Now, we do one final reconfiguration add grant the function’s managed identity read access to the storage account. Therefore, switch to the storage account “sta26a” (Figure 15, A), open “Access Control (IAM)” (B), and click on “add role assignment” (C).

On the next mask, search for the “Storage Blob Data Reader” role and click on “next” (Figure 16, A). On the next mask (B), select “Managed Identity,” click on “+ Select members,” and select “FunctionApp26a”. Then, click on “Select” and “Review + assign.”

Now copy the Azure Function’s URL again into a web browser. Be sure to retrieve the full URL, not just the beginning. If your URL looks like https://functionapp26a.azurewebsites.net/api/Function1, it will fail. It should look like https://functionapp26a.azurewebsites.net/api/Function1?code=**SOME-STRAGE-CHARACTERS**==. The result should look like Figure 17. If so, you made it. Time to celebrate!